Color Correcting 2025: The Ultimate 7-Step Guide to Flawless Skin
The Ultimate Guide to Color Correcting: Mastering Complexion Perfection in 7 Steps for 2025 offers a comprehensive approach to achieving flawless skin by neutralizing imperfections using color theory, covering everything from understanding color correctors to application techniques for a perfect base.
Want to achieve a flawless complexion in 2025? The Ultimate Guide to Color Correcting: Mastering Complexion Perfection in 7 Steps for 2025 will walk you through the art of neutralizing imperfections and creating a perfect canvas for your makeup.
Understanding Color Correcting: The Basics
Color correcting is a makeup technique that uses color theory to neutralize unwanted tones in the skin. By applying specific colors to counteract discolorations, you can create an even base for foundation, resulting in a flawless complexion. In this section, we’ll delve into the color wheel and how it applies to correcting imperfections.
The Color Wheel and Color Correction
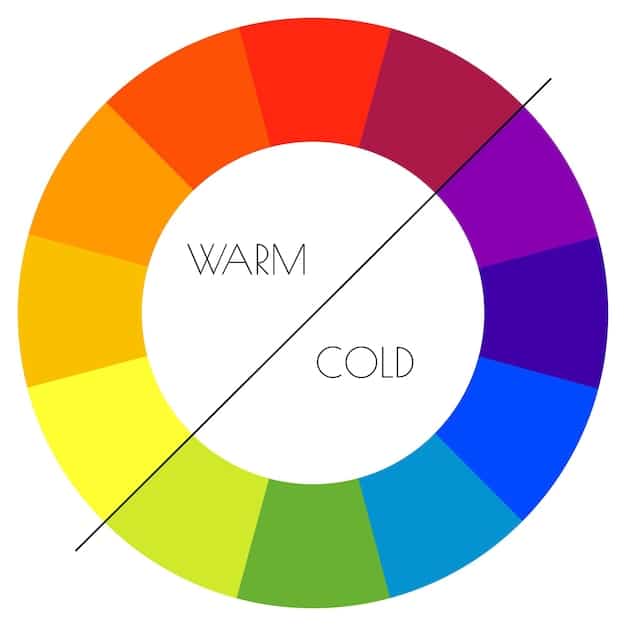
Understanding complementary colors is crucial in color correcting. Complementary colors are opposite each other on the color wheel and, when combined, neutralize each other. This principle is the foundation of color correcting techniques.
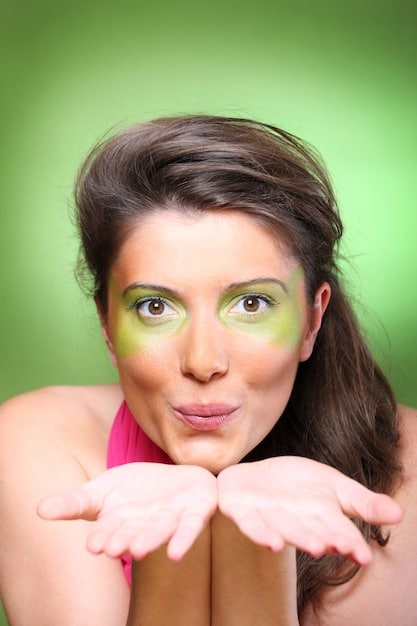
For instance, green neutralizes red, making it ideal for concealing redness caused by acne or rosacea. Similarly, peach or orange correctors are used to counteract blue or purple tones, such as under-eye circles.
- Green: Neutralizes redness from acne, rosacea, or sunburn.
- Peach/Orange: Corrects blue or purple tones under the eyes, especially effective for deeper skin tones.
- Yellow: Cancels out mild redness and brightens dullness.
Knowing the color wheel helps you select the right corrector for your specific skin concerns. Experiment to find the shades that work best for you.
Step 1: Assess Your Skin’s Undertones and Imperfections
Before diving into color correction, it’s essential to accurately assess your skin’s undertones and identify the specific imperfections you want to address. This step will guide you in choosing the right color correctors for your needs.
Identifying Your Skin’s Undertones
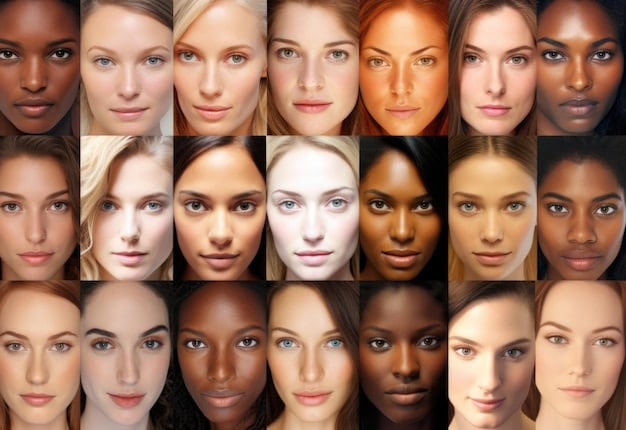
Determining your skin’s undertones will help you select the most effective color correctors. Undertones are the subtle hues beneath the surface of your skin and can be warm, cool, or neutral.
A simple way to identify your undertones is by observing your veins. If your veins appear blue or purple, you likely have cool undertones. If they appear green, you likely have warm undertones. If you can’t discern either color, you may have neutral undertones.
Common Skin Imperfections and Their Correctors
不同的皮肤瑕疵需要不同的颜色校正器。以下是一些常见的皮肤问题和其对应的校正器:
- Redness: Use a green corrector to neutralize redness from acne, rosacea, or sunburn.
- Dark Circles: Peach or orange correctors work best for blue or purple under-eye circles, especially on darker skin tones.
- Dullness: Opt for a yellow corrector to brighten the skin and cancel out mild redness.
Once you’ve identified your undertones and imperfections, you can move on to selecting the right color correctors for your skin.
Step 2: Choosing the Right Color Correctors for Your Skin Tone
Selecting the appropriate color correctors for your skin tone is crucial for achieving a natural and flawless finish. Different skin tones require different shades and intensities of color correctors to effectively neutralize imperfections.
Color Correctors for Fair Skin Tones
For fair skin tones, light peach or pink correctors are ideal for addressing under-eye circles and dullness. These shades provide a subtle brightening effect without appearing too heavy or unnatural.
Green correctors should be used sparingly on fair skin, as they can sometimes create a grayish cast if overapplied. Opt for a light green shade and blend it thoroughly.
Color Correctors for Medium Skin Tones
Medium skin tones can benefit from peach or orange correctors to counteract under-eye circles and hyperpigmentation. These shades provide more coverage and effectively neutralize blue or purple tones.
A yellow corrector can be used to brighten the skin and even out skin tone. Green correctors can be used to address redness, but be sure to blend thoroughly to avoid a greenish tint.
Step 3: Preparing Your Skin for Color Correction
Preparing your skin properly before applying color correctors ensures a smooth and even application, preventing the product from settling into fine lines or appearing patchy. This step involves cleansing, moisturizing, and priming the skin.
Cleansing and Moisturizing
Start by cleansing your skin with a gentle cleanser to remove any dirt, oil, or makeup residue. Follow up with a hydrating moisturizer to create a smooth and supple canvas for your makeup.
Allow the moisturizer to fully absorb into your skin before moving on to the next step. This will prevent the color correctors from sliding around or appearing greasy.
Applying Primer
A primer helps to create a smooth and even surface for makeup application, prolonging the wear time of your color correctors and foundation. Choose a primer that suits your skin type, whether it’s hydrating, mattifying, or pore-filling.
- Hydrating Primer: Ideal for dry skin, providing extra moisture and preventing dryness.
- Mattifying Primer: Controls oil production and minimizes shine, perfect for oily skin.
- Pore-Filling Primer: Blurs the appearance of pores and fine lines, creating a smooth base for makeup.
Apply a thin layer of primer evenly over your face, focusing on areas with imperfections or texture. Allow it to set for a few minutes before proceeding.
By preparing your skin properly, you’ll ensure that your color correctors apply smoothly and blend seamlessly, resulting in a flawless complexion.
Step 4: Applying Color Correctors Strategically
The key to successful color correction lies in the strategic application of the correctors. Applying too much product or using the wrong technique can result in a cakey or unnatural finish.
Using the Right Tools
Using the right tools is essential for precise and even application of color correctors. Small concealer brushes or makeup sponges are ideal for targeting specific areas and blending the product seamlessly.
Avoid using your fingers to apply color correctors, as this can transfer oils and bacteria to your skin, potentially leading to breakouts. Opt for clean and sanitized tools for optimal results.
Application Techniques
Apply color correctors sparingly to the areas where you want to neutralize unwanted tones. Use a dabbing or patting motion to blend the product into your skin, avoiding harsh rubbing or tugging.
- For Redness: Apply green corrector directly to the affected areas, such as acne or rosacea. Blend the edges seamlessly into the surrounding skin.
- For Dark Circles: Apply peach or orange corrector to the under-eye area, focusing on the darkest areas. Blend the product upwards towards your lower lash line.
- For Dullness: Apply yellow corrector to the center of your face, such as your forehead, nose, and chin. Blend the product outwards towards your hairline and jawline.
Remember to layer color correctors gradually, adding more product as needed. Avoid applying too much at once, as this can result in a heavy or unnatural finish.
Step 5: Blending Color Correctors Seamlessly
Blending is a critical step in color correction, ensuring that the correctors seamlessly integrate with your skin and create a smooth canvas for foundation. Poor blending can result in visible lines or patches, defeating the purpose of color correction.
Using a Damp Makeup Sponge
A damp makeup sponge is an excellent tool for blending color correctors seamlessly into your skin. The dampness helps to sheer out the product, preventing it from looking cakey or heavy. It also minimizes the risk of creating harsh lines, ensuring a natural finish.
Before using a makeup sponge, dampen it with water and squeeze out any excess moisture. Gently dab the sponge over the areas where you applied color correctors, using a bouncing motion to blend the product into your skin.
Blending Techniques
When blending color correctors, focus on feathering the edges of the product into the surrounding skin. This will help to create a seamless transition between the corrected areas and the rest of your face. Avoid dragging or rubbing the sponge, as this can disrupt the product and cause it to look patchy.
Pay close attention to areas where you’ve applied multiple layers of color correctors, such as the under-eye area. Take your time and blend thoroughly to ensure that the product looks natural and undetectable.
If you notice any visible lines or patches after blending, lightly dust a translucent powder over the area to set the product and further blend it into your skin. This will help to create a smooth and flawless finish.
Step 6: Applying Foundation and Concealer
Once you’ve successfully color corrected and blended the product seamlessly into your skin, it’s time to apply foundation and concealer to complete your complexion perfection. This step involves selecting the right products and using appropriate techniques to achieve a flawless finish.
Choosing the Right Foundation and Concealer
Select a foundation and concealer that match your skin tone and undertones. Opt for lightweight formulas that provide buildable coverage without feeling heavy or cakey. Avoid using foundations or concealers that are too thick or opaque, as these can accentuate texture and imperfections.
Consider your skin type when choosing your foundation and concealer. If you have dry skin, opt for hydrating formulas that contain moisturizing ingredients. If you have oily skin, choose oil-free or mattifying formulas that control shine.
Application Techniques
Apply foundation evenly over your face using a makeup brush, sponge, or your fingertips. Start in the center of your face and blend outwards towards your hairline and jawline. Use a light touch and build up coverage gradually, focusing on areas where you need more coverage.
Apply concealer to any areas where you still have imperfections or discoloration, such as under-eye circles or blemishes. Use a small concealer brush or your fingertips to dab the product onto the skin, blending the edges seamlessly into the surrounding area.
Step 7: Setting Your Makeup and Adding Finishing Touches
Setting your makeup and adding finishing touches ensures that your color-corrected complexion lasts all day and looks flawless in any lighting. This step involves using setting powder, blush, highlighter, and other products to enhance your features and create a polished look.
Setting Your Makeup
Setting powder helps to lock in your foundation and concealer, preventing them from creasing or fading throughout the day. It also controls oil production and minimizes shine, keeping your complexion looking fresh and matte.
Use a large, fluffy brush to apply a light dusting of setting powder over your face, focusing on areas that tend to get oily, such as your forehead, nose, and chin. Avoid using too much powder, as this can make your skin look dry or cakey.
Adding Finishing Touches
Once you’ve set your makeup, it’s time to add finishing touches to enhance your features and create a polished look. Apply blush to the apples of your cheeks to add a pop of color and warmth to your complexion. Use a highlighter to accentuate your cheekbones, brow bone, and the bridge of your nose.
Consider using a setting spray to meld all of the products together and create a seamless finish. Setting sprays also help to prolong the wear time of your makeup, keeping it looking fresh and flawless for hours.
| Key Point | Brief Description |
|---|---|
| 🎨 Color Wheel | Understanding complementary colors for effective correction. |
| ✨ Skin Prep | Cleansing, moisturizing, and priming for smooth application. |
| 🖌️ Application | Strategic placement with the right tools and techniques. |
| ✅ Blending | Seamless integration for a natural and flawless finish. |
FAQ
▼
Color correcting uses color theory to neutralize unwanted tones by applying complementary colors. For example, green cancels out redness, while peach corrects blue under-eye circles.
▼
Observe your veins: Blue/purple indicates cool undertones, green suggests warm, and indiscernible means neutral. This helps choose the right color corrector shades.
▼
Small concealer brushes or damp makeup sponges work well for precise and even application, ensuring seamless blending without transferring oils from your fingers.
▼
Using a primer is highly recommended. It creates a smooth base, prolongs wear, and prevents correctors from settling into fine lines, enhancing the final result.
▼
Apply correctors sparingly in thin layers, blend seamlessly with a damp sponge, and set with a light dusting of translucent powder to avoid a heavy finish.
Conclusion
Mastering the art of color correction can transform your complexion and boost your confidence. By following these seven steps, understanding color theory, and practicing your technique, you’ll be well on your way to achieving a flawless and radiant look in 2025 and beyond.


