Contour Like a Pro: 5-Minute Flawless Face (2025 Update)
Master the art of contouring with our updated 2025 guide, revealing insider secrets to sculpt your face to perfection in just 5 minutes, using the right tools and techniques for a naturally flawless finish.
Want to how to contour like a pro: insider secrets for a flawless face in 5 minutes (updated for 2025)? Skip the elaborate routines. This guide delivers expert tips for sculpting your face quickly and effectively, keeping you on trend for the coming year.
The Essential Tools for Your 5-Minute Contour
Before diving into the techniques, let’s gather the essentials. Having the right tools will not only speed up the process but also ensure a more precise and professional finish. Here’s what you need for a quick and flawless contour.
Contour Brush: Angled vs. Precise
The brush you choose significantly impacts how the contour blends. An angled brush is great for applying contour to the hollows of your cheeks, while a smaller, more precise brush works best for the nose area.
Highlight Brush: Fan or Tapered
For highlighting, a fan brush softly dusts product onto the high points of your face. A tapered brush offers more control for precise application on areas like the brow bone or cupid’s bow.
- Contour Palette: Cream or powder, choose one that complements your skin tone.
- Highlight: A shade lighter than your skin tone, with shimmer or matte finish.
- Blending Sponge: For seamlessly blending the contour and highlight.
- Setting Spray: To lock your look in place all day.
Having these tools ready will streamline your contouring process. Remember to clean your brushes regularly to maintain hygiene and ensure smooth application.
Choosing the Right Contour Shade for Your Skin Tone
Selecting the correct contour shade is crucial for achieving a natural, sculpted look. A shade that’s too warm can appear orange, while one that’s too cool can look muddy. Here’s a guide to help you find your perfect match.
Fair Skin: Cool-Toned Taupe
For fair skin, opt for a cool-toned taupe shade. This will create a subtle shadow without looking harsh or unnatural. Avoid anything too warm or orange.
Medium Skin: Neutral Brown
Medium skin tones can pull off a wider range of contour shades. A neutral brown with a hint of warmth is generally a safe bet. Test the shade on your skin to ensure it blends seamlessly.
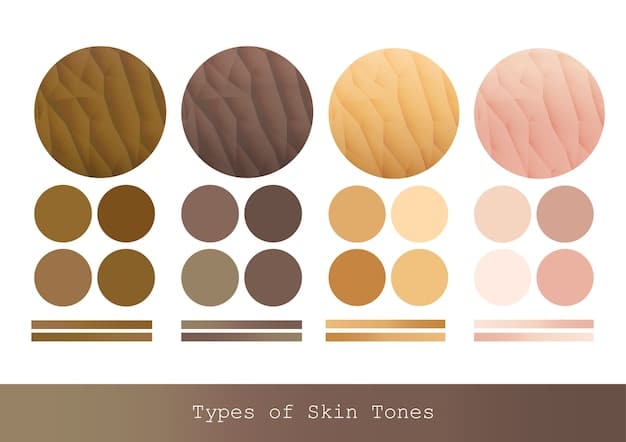
Choosing the right shade is essential for a natural contour. Always test the product in natural light to ensure it complements your skin tone.
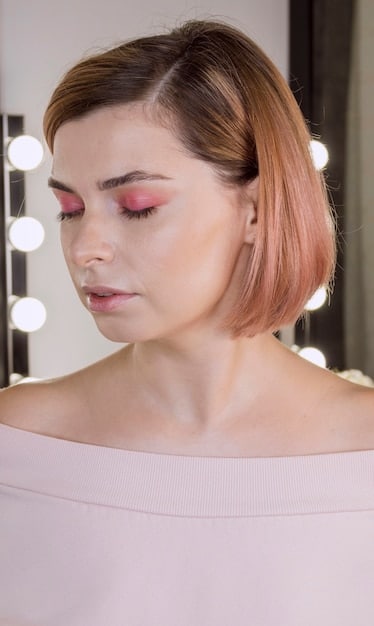
The 5-Minute Contouring Technique: Step-by-Step
Now for the fun part: applying the contour! This step-by-step guide will help you achieve a sculpted look in just five minutes. Speed and precision are key.
Step 1: Prep Your Skin
Start with a clean, moisturized face. Apply your foundation and concealer as usual. This creates a smooth base for your contour to blend seamlessly.
Step 2: Contour the Cheekbones
Using an angled brush, apply contour just below your cheekbones, starting from your ear and blending towards the center of your cheek. Stop before you reach the corner of your mouth to avoid a muddy look.
- Step 3: Highlight the High Points: Use a fan brush to apply highlighter to the tops of your cheekbones, brow bone, and cupid’s bow.
- Step 4: Blend, Blend, Blend: Use a blending sponge or brush to seamlessly blend the contour and highlight into your foundation.
- Step 5: Set Your Look: Finish with a spritz of setting spray to lock everything in place.
With a little practice, you’ll be able to contour your face like a pro in just five minutes. Remember, blend, blend, blend is the key to a natural finish.
Cream vs. Powder Contour: Which Is Right for You?
When it comes to contour products, you have two main options: cream and powder. Each has its own set of pros and cons, and the best choice for you depends on your skin type and desired finish.
Cream Contour: Dewy and Blendable
Cream contours are known for their blendability and natural finish. They’re ideal for dry or mature skin, as they add hydration and don’t settle into fine lines.
Powder Contour: Matte and Long-Lasting
Powder contours offer a matte finish and tend to be more long-lasting. They’re a good choice for oily skin, as they help absorb excess oil and keep your contour in place all day.
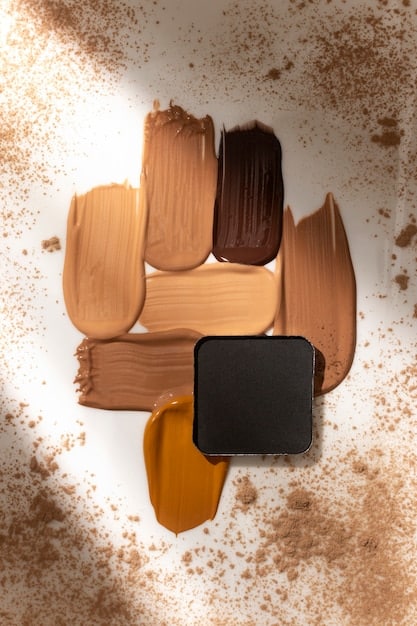
Consider your skin type and desired finish when choosing between cream and powder contour. Experiment with both to see which works best for you.
Advanced Contouring Techniques: Beyond the Basics
Once you’ve mastered the basic contouring technique, you can start experimenting with more advanced methods to further enhance your features. These techniques involve contouring different areas of the face to create specific effects.
Nose Contouring: Slimming and Defining
To make your nose appear slimmer, apply contour along the sides of your nose bridge, blending towards the tip. Highlight the center of your nose to add definition.
Jawline Contouring: Creating Definition
Apply contour along your jawline, starting from your ear and blending towards your chin. This creates a more defined and sculpted jawline.
- Forehead Contouring: Apply contour along your hairline to make your forehead appear smaller.
- Double Chin Contouring: Apply contour under your chin to minimize the appearance of a double chin.
- Blending is Key: Always blend your contour seamlessly for a natural finish.
These advanced techniques can help you customize your contour to your specific facial features. Practice makes perfect, so don’t be afraid to experiment.
Contouring Mistakes to Avoid for a Flawless Finish
Contouring can be tricky, and it’s easy to make mistakes that can sabotage your entire look. Here are some common contouring pitfalls to avoid.
Using the Wrong Shade
As mentioned earlier, using the wrong contour shade can make your skin look muddy or orange. Always choose a shade that complements your skin tone.
Applying Too Much Product
Less is more when it comes to contouring. Start with a small amount of product and build up the intensity gradually. It’s easier to add more than to remove excess product.
Avoiding these common mistakes will help you achieve a flawless, natural-looking contour every time.
| Key Point | Brief Description |
|---|---|
| 🎨 Correct Shade | Choose a contour shade that complements your skin tone. |
| 🧽 Blending | Blend thoroughly for a seamless and natural look. |
| ✨ Highlighting | Highlight key areas to enhance your features. |
| ⏳ Quick Steps | Follow a streamlined routine to contour in just 5 minutes. |
[FAQ]
Frequently Asked Questions
▼
For fair skin, it’s best to use cool-toned taupe shades. These colors mimic natural shadows without appearing orange or muddy, providing a subtle and sculpted effect.
▼
Use a damp blending sponge or a soft blending brush in circular motions to diffuse the contour lines. Ensure there are no harsh edges and that the contour merges seamlessly with your foundation.
▼
Bronzer is generally warmer and adds color to the face, while contour is cooler and creates shadows. If the bronzer is matte and not too warm, it can work, but a dedicated contour product is preferable.
▼
Apply highlighter to the high points of your face where light naturally hits like the tops of your cheekbones, brow bone, down the center of your nose, and on your cupid’s bow for a radiant glow.
▼
Cream contours are hydrating and best for dry skin, providing a dewy finish. Powder contours are matte and ideal for oily skin, offering a long-lasting, shine-free look.
Conclusion
Mastering the art of contouring doesn’t require hours in front of the mirror. With the right tools, techniques, and a bit of practice, you can achieve a flawlessly sculpted face in just five minutes. Keep these insider secrets in mind as you refine your technique for a naturally enhanced look that will stay on point through 2025.
")
")


