Contour Like a Pro: 5-Minute Flawless Face (2025 Update)
Master the art of contouring with our updated-for-2025 guide, revealing insider secrets to sculpt your face to perfection in just 5 minutes, using the right tools and techniques for a flawless, professional finish.
Want to achieve a sculpted, flawless face in just five minutes? This updated-for-2025 guide, “**How to Contour Like a Pro: Insider Secrets for a Flawless Face in 5 Minutes (Updated for 2025)**,” will reveal all the expert tips and tricks you need.
Why Contour? The Power of a Sculpted Face
Contouring is more than just a makeup trend; it’s a technique that can enhance your natural features and create a more defined, sculpted look. With the right products and techniques, you can achieve a professional-looking contour in just a few minutes.
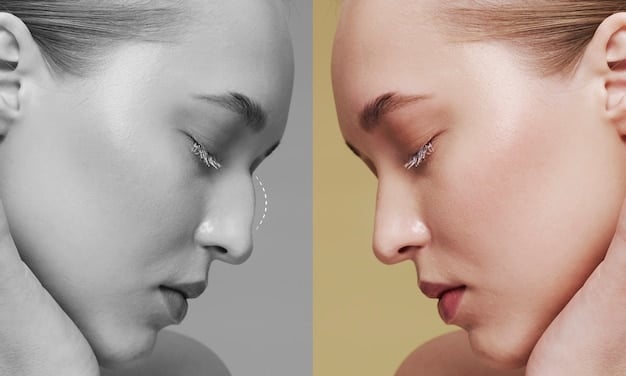
Think of contouring as playing with light and shadow. By strategically applying darker shades to areas you want to recede and lighter shades to areas you want to bring forward, you can create the illusion of higher cheekbones, a slimmer nose, or a more defined jawline.
Understanding Light and Shadow
The key to successful contouring lies in understanding how light and shadow interact with your face. Darker shades create shadows, making areas appear smaller, while lighter shades reflect light, making areas appear larger.
- Identify your face shape to determine where to apply contour.
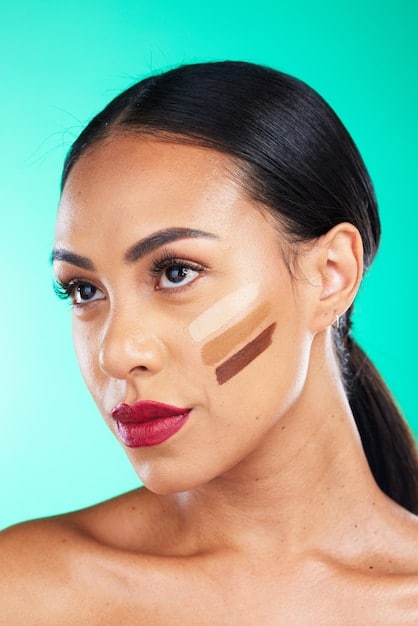
- Use a matte contour product that is two to three shades darker than your skin tone.
- Blend, blend, blend! Seamless blending is essential for a natural look.
Ultimately, contouring is a technique that allows you to customize your look and enhance your natural beauty. It’s about creating a more balanced and harmonious appearance, rather than trying to completely change your features.
Choosing the Right Contour Products for Your Skin Tone
Selecting the right contour products is crucial for achieving a natural and seamless finish. The ideal products will complement your skin tone and blend effortlessly, creating subtle shadows that enhance your features.
From powders to creams to sticks, the market offers a wide array of contour products. Each formulation has its own unique benefits, catering to different skin types and preferences.
Powder Contours: A Classic Choice
Powder contours are a popular choice for those with oily or combination skin, as they tend to have a matte finish and can help control shine. They’re also great for beginners, as they’re easy to blend and build up.
Cream Contours: For a Dewy Glow
Cream contours provide a more hydrating and luminous finish, making them ideal for dry or mature skin. They tend to blend seamlessly into the skin, creating a natural, airbrushed effect. Consider using a damp sponge for application.
- Match the undertone of your contour product to your skin’s undertone (warm, cool, or neutral).
- Consider the intensity of the pigment. Start with a lighter shade and build up the intensity as needed.
- Don’t forget to choose a highlighter!
Choosing the right contour product ultimately comes down to personal preference and skin type. Experiment with different formulations and shades to find what works best for you. Blending is always key to success!
The Essential Tools for a 5-Minute Contour
Having the right tools can make all the difference in achieving a flawless contour in just five minutes. High-quality brushes and sponges designed for specific purposes will allow for precise application and seamless blending.
From angled brushes to blending sponges, the right tools will help you achieve a professional-looking contour with ease.
Brushes: Precision and Control
Brushes offer precision and control, allowing you to target specific areas of your face for contouring and highlighting. An angled brush is ideal for applying contour to the cheekbones, while a smaller, tapered brush can be used for nose contouring.
Sponges: Seamless Blending
Blending sponges are essential for creating a seamless, airbrushed finish. They help to diffuse harsh lines and blend the contour product into your skin for a natural look.
- Choose brushes with soft, dense bristles for optimal blending.
- Dampen your blending sponge for a smoother, more even application.
- Clean your brushes and sponges regularly to prevent bacteria buildup and ensure optimal performance.
Using the right tools can significantly improve your contouring skills and help you achieve a flawless result quickly and easily. Experiment with different tools to find what works best for your face shape and preferred application style.
Step-by-Step: Your 5-Minute Contouring Routine
Now, let’s break down the step-by-step process of contouring like a pro in just five minutes. This routine focuses on simplicity and efficiency, using key techniques to sculpt and define your features without spending hours on makeup.
This routine will guide you through the essential steps of contouring, from prepping your skin to blending the final touches, ensuring a flawless and natural-looking result.
Step 1: Prep Your Skin
Start with a clean, moisturized face. Apply your foundation and concealer as usual.
Step 2: Apply Contour
Using an angled brush, apply your contour product to the hollows of your cheeks, starting from your ear and blending towards the corner of your mouth. Also, apply contour along your temples and jawline.
In summary, by following these steps and using the right products and tools, you can achieve a professional-looking contour in just five minutes. Remember, practice makes perfect, so don’t be afraid to experiment and find what works best for you.
Contouring for Different Face Shapes
One of the most important aspects of successful contouring is understanding your face shape and tailoring your technique accordingly. Different face shapes benefit from different contour placements to enhance their natural features and create a more balanced look.
Whether you have a round, square, oval, or heart-shaped face, there are specific contouring techniques that can help you achieve your desired sculpted look.
Round Face: Creating Definition
If you have a round face, your goal is to create the illusion of more defined cheekbones and a slimmer face shape. Apply contour to the hollows of your cheeks, temples, and jawline to add dimension.
Square Face: Softening the Edges
For a square face, focus on softening the angular features by applying contour to the corners of your forehead and along your jawline. This will help to round out your face shape.
- Oval Face: Highlighting the cheekbones and jawline
- Heart-Shaped Face: Softening the chin and forehead
Adapting your contouring technique to your face shape can make a significant difference in the overall result. By understanding your unique features and applying contour strategically, you can achieve a more balanced and harmonious look.
Mistakes to Avoid: Contouring Don’ts
While How to Contour Like a Pro: Insider Secrets for a Flawless Face in 5 Minutes (Updated for 2025) can be an amazing tool for enhancing your features, it’s also easy to make mistakes that can result in a muddy or unnatural look. Avoiding these common pitfalls will help you achieve a flawless and professional-looking contour every time.
One of the biggest mistakes is using the wrong shade of contour, also failing to blend the product seamlessly into your skin. Here’s what to avoid:
- Using a contour shade that is too dark, which can create harsh lines and an unnatural look.
- Skipping blending, which results in obvious stripes of color.
- Applying contour in the wrong areas, such as too low on the cheeks or too close to the nose.
- Using the wrong tools, such as a brush that is too small or too stiff.
- Neglecting to set your contour with powder, which can cause it to fade or smudge throughout the day.
By avoiding these common mistakes, you can ensure that your contour looks natural, seamless, and enhances your features in the most flattering way possible. Pay attention to detail, blend thoroughly, and choose the right products and tools for your skin tone and face shape.
| Key Point | Brief Description |
|---|---|
| ✨ Choose Right Shade | Select a contour that’s 2-3 shades darker than your skin tone. |
| 🖌️ Use Proper Tools | Angled brushes and blending sponges are perfect for contouring. |
| ⏳ Blend Quickly | Blend contour within 5 minutes for a seamless finish. |
| 🔄 Know Face Shape | Apply contour according to your face shape for targeted definition. |
FAQ
▼
Start with a shade that is close to your natural skin tone, and use powder products instead of creams, as they are easier to blend. Begin with a light hand and build intensity gradually.
▼
For fair skin, choose a cool-toned light brown or taupe shade. Medium skin tones should opt for a neutral brown, while deeper skin tones look best with warm-toned, deep browns.
▼
While bronzer can add warmth, it’s not ideal for contouring as it typically has shimmer and warmer undertones. Contouring shades should be matte and cool-toned to mimic natural shadows.
▼
An angled contour brush is great to create precise lines, while a fluffy blending brush will help diffuse harsh lines and create a seamless finish.
▼
Use a soft, fluffy brush or a damp blending sponge to blend the contour upwards and outwards. Make sure there are no harsh lines and the contour seamlessly transitions into your foundation.
Conclusion
Mastering the art of contouring can transform your makeup routine, allowing you to sculpt and define your features with ease. By following our tips and techniques, you can achieve a **How to Contour Like a Pro: Insider Secrets for a Flawless Face in 5 Minutes (Updated for 2025)** in just five minutes, creating a flawless and professional-looking result every time you do it.
")
")


