How to Apply False Eyelashes Like a Pro: Your Step-by-Step Guide

Applying false eyelashes can transform your look, adding glamour and definition to your eyes; this tutorial provides a simple, step-by-step guide to achieving a professional-looking application at home, ensuring a flawless and comfortable finish.
Ready to elevate your makeup game? Learning how to apply false eyelashes like a pro is easier than you think, and this tutorial will guide you through each step for a flawless, natural-looking finish.
Gather Your Supplies
Before you begin your false eyelash journey, it’s crucial to have all the necessary tools and products at your fingertips. This preparation will streamline the process and ensure a smoother, more successful application.
Essential Items for Eyelash Application
Here’s a breakdown of the key items you’ll need to get started:
- False Eyelashes: Choose a style that complements your eye shape and desired look. Consider length, volume, and band thickness.
- Eyelash Adhesive: Opt for a high-quality, latex-free adhesive that dries clear or dark, depending on your preference.
- Eyelash Applicator: These tweezers or specialized tools provide precise control and placement of the lashes.
- Scissors: Small, sharp scissors are necessary for trimming the lashes to fit your eye shape.
- Mascara: Use mascara to blend your natural lashes with the false ones for a seamless look.
- Eyelash Curler: Curling your natural lashes helps them better integrate with the false lashes.
Having these supplies ready will make the application process much easier and more enjoyable.
In conclusion, gathering the right supplies is a foundational step in achieving a flawless false eyelash application. Ensure you have each of these items before moving on to the next step.
Prepare Your Natural Lashes
Preparing your natural lashes is an often overlooked but essential step in achieving a seamless and natural-looking false eyelash application. This process ensures that the false lashes blend seamlessly with your own, creating a more polished and cohesive look.
Curling and Applying Mascara
Start by gently curling your natural lashes using an eyelash curler. Hold the curler in place for a few seconds, being careful not to pinch your eyelid. Next, apply a thin coat of mascara to your natural lashes. This will provide a base for the false lashes to adhere to and help them blend together.
Remember to use a mascara that isn’t too clumpy, as this can weigh down your natural lashes and make it harder for the false lashes to stay in place.
Trimming the False Eyelashes
Carefully remove the false eyelashes from their packaging. Hold them up to your eye to measure the length. If the lashes are too long for your eye, use small scissors to trim them from the outer corner. Trimming the lashes ensures they fit comfortably and look natural.
- Measure Twice, Cut Once: Always measure the lashes against your eye before trimming to avoid cutting off too much.
- Trim from the Outer Corner: This helps maintain the natural shape of the lashes.
- Small Increments: Trim small sections at a time until you achieve the desired length.
In summary, preparing your natural lashes and trimming the false eyelashes are crucial steps in achieving a seamless and comfortable application.
Apply the Eyelash Adhesive
Applying the eyelash adhesive with precision is a critical step that determines the longevity and comfort of your false eyelashes. Ensuring you use the right amount and allow it to become tacky is key to a successful application.
The Right Amount of Glue
Squeeze a thin, even line of eyelash adhesive along the band of the false eyelashes. Avoid using too much glue, as this can make the application messy and cause the lashes to slip around. Conversely, using too little glue will result in the lashes not adhering properly.
A thin, consistent line is all you need for a secure hold.
Waiting for Tacky Consistency
After applying the adhesive, wait for about 20-30 seconds until the glue becomes tacky. This allows the adhesive to develop the right consistency for bonding with your eyelid. If the glue is too wet, the lashes will slide around; if it’s too dry, they won’t adhere at all.
The tacky consistency ensures a secure and lasting hold.
In short, mastering the application of eyelash adhesive involves using the right amount and waiting for the perfect tacky consistency. These steps are essential for a long-lasting and comfortable wear.
Position and Secure the Lashes
The placement and securing of false eyelashes is where precision and a steady hand come into play. Achieving the right positioning ensures that the lashes look natural and complement your eye shape.
Using an Applicator for Precision
Using an eyelash applicator, gently grasp the false eyelashes in the center. Position the lashes as close to your natural lash line as possible, starting from the inner corner of your eye and working your way outwards. Avoid placing the lashes too far from your lash line, as this can look unnatural.
- Center First: Position the center of the lash band first, then adjust the inner and outer corners.
- Close to the Lash Line: The closer the false lashes are to your natural lash line, the more seamless the look.
- Gentle Pressure: Use gentle pressure to secure the lashes in place.
Adjusting for Comfort and Appearance
Once the lashes are in place, use the applicator or your fingertips to gently press the band down along your lash line. Pay special attention to the inner and outer corners, ensuring they are securely attached. If any adjustments are needed, make them while the adhesive is still slightly tacky.
Proper positioning ensures a comfortable and natural look.
In summary, positioning and securing the lashes requires precision and a gentle touch. Utilizing an applicator and making necessary adjustments ensures a comfortable and aesthetically pleasing result.
Blend Natural and False Lashes
Blending your natural lashes with the false ones is a crucial step in creating a seamless and cohesive look. This ensures that there are no visible gaps or distinctions between your real and artificial lashes.
Applying Another Coat of Mascara
After the false eyelashes are securely in place, apply another light coat of mascara to blend your natural lashes with the false ones. This helps to bind them together and create a more uniform appearance. Be careful not to apply too much mascara, as this can make the lashes look clumpy and unnatural.
A light coat is all you need to achieve a seamless blend.
Pinching for a Natural Curve
Use your fingers or an eyelash applicator to gently pinch your natural and false lashes together. This helps to create a natural curve and ensures that they are aligned properly. Pinching also helps to hide the lash band and make the false lashes look like they are growing directly from your lash line.

A gentle pinch creates a natural and cohesive look.
In short, blending natural and false lashes involves applying a light coat of mascara and gently pinching them together. These steps are essential for achieving a seamless and natural-looking result.
Finishing Touches and Maintenance
Adding the final touches and understanding how to properly maintain your false eyelashes can significantly extend their lifespan and keep them looking their best. These steps are often overlooked but are crucial for both appearance and hygiene.
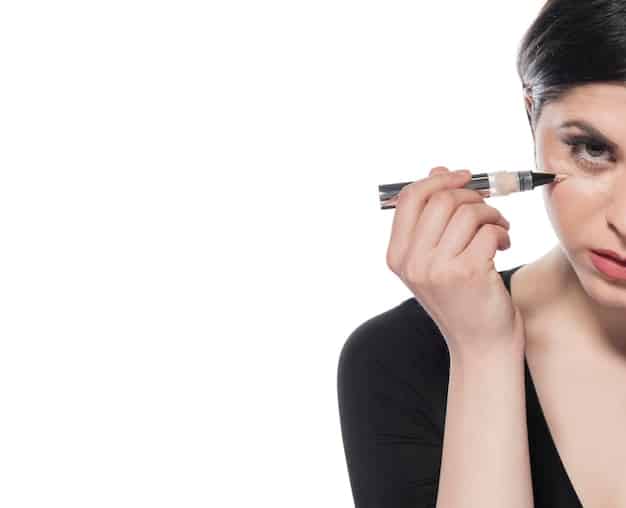
Applying Eyeliner to Conceal the Band
To further conceal the lash band and create a more polished look, apply a thin line of eyeliner along your upper lash line. This helps to fill in any gaps and create a seamless transition between your eyelid and the false lashes. Choose an eyeliner color that complements your eye makeup and natural skin tone.
A well-applied eyeliner can make a significant difference.
Proper Removal and Cleaning
When it’s time to remove your false eyelashes, gently peel them off starting from the outer corner of your eye. Avoid pulling or tugging, as this can damage your natural lashes. After removal, use a cotton swab dipped in makeup remover to clean any residual adhesive from the lash band. Store your false eyelashes in their original packaging to maintain their shape and prevent them from getting damaged.
- Gentle Removal: Always remove false eyelashes gently to avoid damaging your natural lashes.
- Clean the Band: Removing adhesive extends the life of your false eyelashes and maintains hygiene.
- Proper Storage: Storing lashes in their original case helps them retain their shape.
In summary, finishing touches such as eyeliner application and proper maintenance through gentle removal and cleaning are essential for extending the life and appearance of your false eyelashes.
| Key Point | Brief Description |
|---|---|
| ✅ Supplies | Gather eyelashes, adhesive, applicator, scissors, mascara, and curler. |
| 🧽 Preparation | Curl natural lashes, apply mascara, and trim false lashes for fit. |
| ✨ Application | Apply adhesive, wait until tacky, and position lashes close to lash line. |
| 👁️ Blending | Blend natural and false lashes with mascara, pinching for a natural curve. |
Frequently Asked Questions
▼
Consider your eye shape and the occasion. For a natural look, opt for shorter, less voluminous lashes. For a more dramatic effect, choose longer, fuller lashes. Experiment to find what suits you best!
▼
Latex-free adhesives are ideal to avoid allergic reactions. Choose one that dries clear or dark based on your preference. Clear adhesives are more forgiving, while dark adhesives can enhance the eyeliner effect.
▼
With proper care, you can reuse false eyelashes multiple times. Clean them after each use to remove adhesive and makeup residue. Store them in their original case to maintain their shape and hygiene.
▼
Yes, but apply mascara sparingly to blend your natural and false lashes. Too much mascara can weigh down the lashes and make them look clumpy. A light coat is usually sufficient for a seamless blend.
▼
Gently peel off the lashes starting from the outer corner. Use makeup remover to dissolve the adhesive if needed. Never pull or tug harshly. Follow up with a nourishing lash serum to keep your natural lashes healthy.
Conclusion
Mastering the art of applying false eyelashes like a pro involves patience, practice, and the right techniques. By following this step-by-step tutorial, you can achieve a flawless and natural-looking lash application that enhances your overall makeup look. Remember to choose the right lashes, prepare your natural lashes, apply adhesive correctly, and blend everything seamlessly for stunning results.


