Master the Cat Eye: Your Ultimate Eyeliner Application Guide
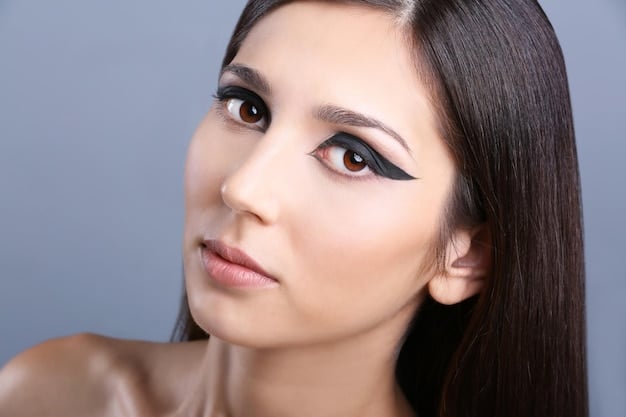
Get the Perfect Cat Eye: A Beginner’s Guide to Eyeliner Application provides a comprehensive, step-by-step approach to achieving this classic makeup look, covering essential tools, techniques, and tips for various eye shapes and skill levels.
Looking to nail that sleek, sophisticated Get the Perfect Cat Eye: A Beginner’s Guide to Eyeliner Application? It might seem daunting, but with the right tools and techniques, anyone can master this iconic look. Let’s break it down and get you lining like a pro!
Choosing the Right Eyeliner for Your Cat Eye
The foundation of any great cat eye is, of course, your eyeliner. But with so many options available, how do you choose the right one? The answer depends on your skill level and the look you want to achieve.
Liquid Eyeliner
Liquid eyeliner is a classic choice for creating a sharp, defined cat eye. It offers intense pigmentation and a long-lasting finish, making it ideal for special occasions or when you want your look to last all day. However, it can be tricky to master, especially for beginners.
Gel Eyeliner
Gel eyeliner offers a happy medium between liquid and pencil. It’s creamy, blendable, and provides a smooth, matte finish. Gel liner is applied with a brush, giving you precise control over the thickness and shape of your wing.
Pencil Eyeliner
Pencil eyeliner is the most beginner-friendly option for creating a cat eye. It’s easy to control and allows for a softer, more smudged look. While it may not offer the same level of precision as liquid or gel, it’s perfect for practicing and experimenting with different wing shapes.
- Liquid Eyeliner: Best for sharp, defined lines and long-lasting wear, but requires more practice.
- Gel Eyeliner: Offers a balance of precision and blendability, suitable for intermediate users.
- Pencil Eyeliner: Easiest to use for beginners, ideal for softer, smudged cat eyes.
- Eyeliner Pens: Great for beginners because they are easy to control and precise.
Ultimately, the best eyeliner for you is the one you feel most comfortable using. Don’t be afraid to experiment with different types until you find your perfect match.
Preparing Your Eyelids for Eyeliner
Before you even think about picking up your eyeliner, it’s essential to prep your eyelids. A smooth, even canvas will ensure that your liner glides on effortlessly and stays put all day.
Cleanse and Moisturize
Start by cleansing your eyelids with a gentle cleanser to remove any oil or residue. Follow up with a lightweight moisturizer to hydrate the skin and create a smooth base for your makeup.
Prime Your Lids
Eyelid primer is your secret weapon for preventing creasing and smudging. Apply a thin layer of primer to your eyelids and blend it in well. This will create a tacky surface that helps your eyeliner adhere better.
Set with Powder
If you have oily eyelids, you may want to set your primer with a translucent powder. This will further absorb excess oil and create an even smoother surface for your eyeliner.
By taking the time to prep your eyelids properly, you’ll create a flawless canvas for your cat eye and ensure that it lasts all day.
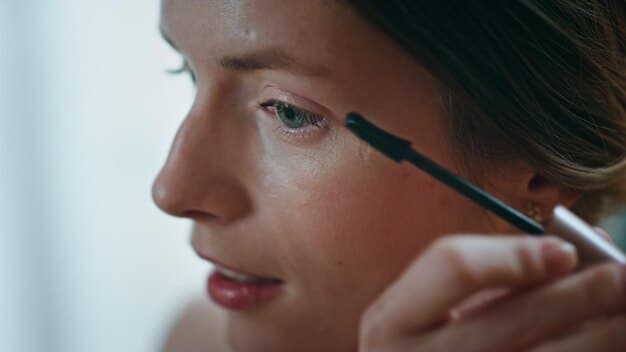
The Basic Cat Eye Technique: A Step-by-Step Guide
Now that you’ve chosen your eyeliner and prepped your eyelids, it’s time to dive into the technique. Here’s a step-by-step guide to creating a classic cat eye:
Step 1: Map Out Your Wing
Start by creating a guideline for your wing. Using a pencil eyeliner or a light-colored eyeshadow, draw a line extending upwards from the outer corner of your eye. The angle of the line will determine the shape of your wing, so take your time and experiment until you find a shape that suits your eye.
Step 2: Connect the Line
Next, connect the end of your wing to your upper lash line. This will create the outer triangle of your cat eye. Fill in the triangle with your chosen eyeliner.
Step 3: Line Your Upper Lash Line
Now, line your upper lash line, starting from the inner corner of your eye and working your way outwards. Keep the line thin and close to your lashes. As you reach the outer corner of your eye, gradually thicken the line to connect it to your wing.
Step 4: Perfect the Shape
Take a clean, angled brush and dip it in some makeup remover. Use the brush to clean up any mistakes and sharpen the edges of your wing. This will give your cat eye a crisp, polished look.
With a steady hand and a little practice, you’ll be rocking a perfect cat eye in no time!
Adapting the Cat Eye for Different Eye Shapes
One of the biggest challenges in mastering the cat eye is adapting it to your unique eye shape. What works for one person may not work for another. Here are some tips for tailoring your cat eye to different eye shapes:
Almond Eyes
Almond eyes are the most versatile shape for a cat eye. You can wear almost any wing shape, from a classic, subtle flick to a bold, dramatic wing.
Round Eyes
To elongate round eyes, create a longer, more angled wing. Avoid thickening the liner in the middle of your eye, as this will make your eyes appear even rounder.
Hooded Eyes
Hooded eyes can be tricky to line, as the eyelid covers the crease. To create a cat eye that’s visible when your eyes are open, draw a thicker wing that extends beyond the hood.
Downturned Eyes
To lift downturned eyes, create a shorter, more upward-angled wing. This will create the illusion of a more lifted eye shape.
Remember, the key to a perfect cat eye is experimentation. Don’t be afraid to try different shapes and angles until you find what works best for you.
Advanced Techniques for the Perfect Cat Eye
Once you’ve mastered the basic cat eye, you can start experimenting with more advanced techniques to create unique and personalized looks:
The Double-Winged Cat Eye
This edgy look involves creating two wings – one on your upper lash line and one on your lower lash line. The space between the wings can be left empty or filled with a contrasting color.
The Smoked-Out Cat Eye
For a softer, more romantic look, try smoking out your cat eye with eyeshadow. Apply a dark eyeshadow to your upper lash line and blend it outwards towards your wing.
The Graphic Cat Eye
This bold look involves creating a geometric or abstract wing shape using vibrant colors or metallic finishes.
- Double-Winged: Edgy look with two wings on upper and lower lash lines.
- Smoked-Out: Softer look, blending dark eyeshadow towards the wing.
- Graphic: Bold, geometric wings using vibrant colors.
The possibilities are endless when it comes to creating unique cat eye looks. Let your creativity run wild and have fun experimenting!
Troubleshooting Common Cat Eye Mistakes
Even the most experienced makeup artists make mistakes when creating a cat eye. Here are some common mistakes and how to fix them:
Uneven Wings
If your wings are uneven, don’t panic! Use a cotton swab dipped in makeup remover to adjust the shape and angle of each wing until they match. You can also use a small angled brush and eyeshadow to create a more even blend.
Smudged Liner
If your eyeliner smudges, use a cotton swab to clean up the smudges. You can also apply a thin layer of translucent powder under your eyes to prevent further smudging.
Wobbly Lines
If your lines are wobbly, try using a series of small, connected dots instead of one continuous line. This will give you more control and create a smoother finish.
Remember, practice makes perfect! Don’t get discouraged if your cat eye isn’t perfect at first. Keep practicing, and you’ll eventually master the technique.
| Key Point | Brief Description |
|---|---|
| 🧰 Choosing Eyeliner | Select liquid, gel, or pencil based on skill & desired look. |
| ✍️ Basic Technique | Map wing, connect to lash line, and perfect the shape. |
| 👁️ Eye Shapes | Adapt cat eye for almond, round, hooded, or downturned eyes. |
| 💡 Advanced Techniques | Try double-winged, smoked-out, or graphic cat eye styles. |
Frequently Asked Questions
▼
Pencil eyeliner is generally recommended for beginners due to its ease of control and forgiving nature, allowing for practice and corrections more easily than liquid or gel liners.
▼
Prevent smudging by priming your eyelids, using waterproof eyeliner, and setting with translucent powder. Avoid touching your eyelids throughout the day to minimize oil transfer.
▼
Correct uneven wings by using a cotton swab dipped in makeup remover to adjust the shape and angle of each wing until they match. Ensure both eyes are open to visualize symmetry.
▼
To make your cat eye last, use a good primer, waterproof eyeliner, set with powder, and avoid excessive touching. A setting spray can also help lock in the look.
▼
Yes, you can definitely do a cat eye with hooded eyes! Draw a thicker wing that extends beyond the hood so it’s visible even when your eyes are open. Experiment to find the best angle.
Conclusion
Mastering the cat eye is a journey that requires patience, practice, and experimentation. With the right tools, techniques, and a little bit of persistence, you’ll be rocking a flawless cat eye in no time. So go ahead, grab your eyeliner, and unleash your inner makeup artist!


