Smokey Eye Tutorial: Step-by-Step Guide for Beginners

Creating a smokey eye is easier than you think! This step-by-step tutorial provides beginners with simple instructions, product recommendations, and blending techniques to achieve a flawless smokey eye look at home.
Ever admired a perfect smokey eye? It might seem complicated, but how to create a smokey eye: a step-by-step tutorial for beginners will unveil the secrets, transforming you from novice to pro in no time.
What You’ll Need to Create a Smokey Eye
Before diving in, it’s essential to gather your tools and products. Having everything within reach makes the process smoother and ensures you won’t be scrambling mid-application.
Essential Makeup Brushes
The right brushes are crucial for blending and precise application.
- Blending Brush: A fluffy brush to seamlessly blend eyeshadows.
- Flat Shader Brush: For packing color onto the lid.
- Pencil Brush: Perfect for smudging along the lash line.
Investing in quality brushes makes a noticeable difference in the final outcome. They help distribute the product evenly and prevent harsh lines.

Keeping your brushes clean is also vital for hygiene and optimal performance. Regular cleaning prevents product buildup and ensures a smooth application every time.
Choosing the Right Eyeshadows
Selecting the right eyeshadows is key to achieving the desired smokey eye effect. While classic black is popular, you can explore various color palettes.
Selecting Your Colors
Consider these factors when choosing your eyeshadows:
- Pigmentation: Opt for highly pigmented shades for intense color payoff.
- Blendability: Ensure the eyeshadows blend easily to avoid harsh lines.
- Palette: Choose a palette with coordinated shades for effortless layering.
Neutral palettes with browns, greys, and taupes are versatile and suitable for creating softer, everyday smokey eyes. Experiment with shimmer and matte finishes to add dimension.
Don’t be afraid to try colors outside the traditional black and grey. Bronze, plum, and even forest green can create stunning smokey eye looks.
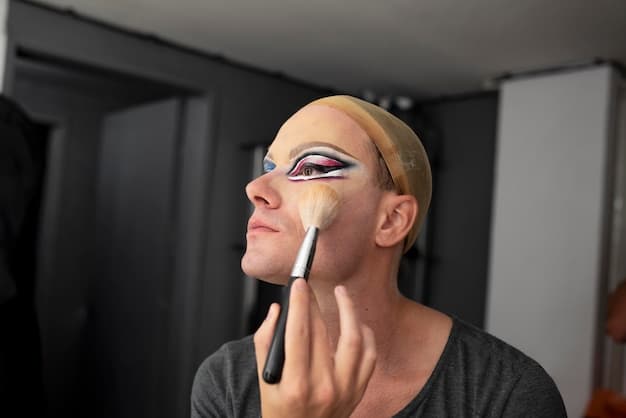
Step-by-Step: Applying Your Smokey Eye
Now, let’s get into the step-by-step process of creating a smokey eye. Follow these instructions for a flawless application.
Prime Your Eyelids
Start by applying an eyeshadow primer to your eyelids. This creates a smooth base and helps the eyeshadows adhere better, preventing creasing and fading.
- Apply a small amount of primer to your fingertip.
- Gently pat the primer onto your entire eyelid, from lash line to brow bone.
- Allow the primer to dry for a few seconds before applying eyeshadow.
If you don’t have a dedicated eyeshadow primer, a concealer or foundation can work as a substitute. Just make sure to set it with a translucent powder to prevent creasing.
Apply a Transition Shade
A transition shade is a light-to-medium color that helps blend the darker shades seamlessly. Apply this shade to your crease using a blending brush.
Use windshield wiper motions to blend the transition shade back and forth in your crease. This creates a soft gradient and ensures the darker shades don’t look harsh.
Building the Smokey Effect
This is where the magic happens. Layer dark eyeshadows to create the smokey effect. Start with a medium-toned shade and gradually build up the intensity.
Applying the Darker Shade
Using a flat shader brush, apply the darker eyeshadow shade to your eyelid, focusing on the outer corner and lash line.
- Gently pat the eyeshadow onto your lid, avoiding the inner corner.
- Blend the edges of the dark shade towards the crease, connecting it with the transition shade.
- Add more layers of the dark shade to build up the intensity as desired.
For a more dramatic look, extend the dark shade slightly beyond the outer corner of your eye to create a winged effect.
Smudging Along the Lash Line
Use a pencil brush to smudge the dark eyeshadow along your upper and lower lash lines. This creates a soft, diffused line that adds depth and intensity.
Use short, back-and-forth motions to smudge the eyeshadow along your lash line. Connect the upper and lower lines at the outer corner for a seamless look.
Highlighting and Blending
Highlighting and blending are essential for creating a polished and professional-looking smokey eye. These steps add dimension and soften any harsh lines.
Applying a Highlight Shade
Apply a light, shimmering eyeshadow to your brow bone and inner corner of your eye. This highlights these areas and brightens your eyes.
Use a small brush to apply the highlight shade precisely. Blend the highlight shade into the transition shade for a seamless finish.
A touch of highlight can make your eyes appear larger and more awake.
Finish by blending all the eyeshadows together using a clean blending brush. This ensures there are no harsh lines and creates a smooth, gradient effect.
Creating a smokey eye involves carefully layering and blending eyeshadows. Start with a primer and transition shade, build up the darker shades, and finish with highlights and seamless blending for a captivating look.
| Key Point | Brief Description |
|---|---|
| ✨ Primer Application | Creates a smooth base for eyeshadow and prevents creasing. |
| 🎨 Eyeshadow Selection | Choose pigmented and blendable shades for seamless layering. |
| 🖌️ Blending Technique | Use windshield wiper motions to blend shades in the crease. |
| 🌟 Highlighting Touch | Apply a light, shimmering shade to the brow bone and inner corner for brightness. |
Frequently Asked Questions (FAQs)
▼
The best eyeshadow primer creates a smooth base, prevents creasing, and enhances eyeshadow color. Look for primers with long-lasting formulas from brands like Urban Decay, NARS, or Too Faced for reliable performance.
▼
To avoid a muddy look, use a light hand and build color gradually. Start with a transition shade and blend thoroughly between each layer. Clean your brush frequently to prevent color mixing.
▼
Absolutely! Experiment with bronze, plum, green, or even blue shades for a unique smokey eye. Just ensure the colors complement each other and blend seamlessly for a cohesive look.
▼
A fluffy, tapered blending brush is ideal for blending eyeshadows. Its soft bristles and gradual shape allow for smooth diffusion and prevent harsh lines. Sigma, Morphe, and Real Techniques offer great options.
▼
To ensure your smokey eye lasts all day, start with a good eyeshadow primer, use powder eyeshadows (which tend to last longer than creams), set your look with a makeup setting spray, and avoid touching your eyes.
Conclusion
Mastering the smokey eye technique can elevate your makeup game, providing a versatile and captivating look suitable for various occasions. With practice and patience, you can confidently create a flawless smokey eye that enhances your natural beauty.


")
