Smoky Eye Tutorial: 10 Easy Steps for Beginners
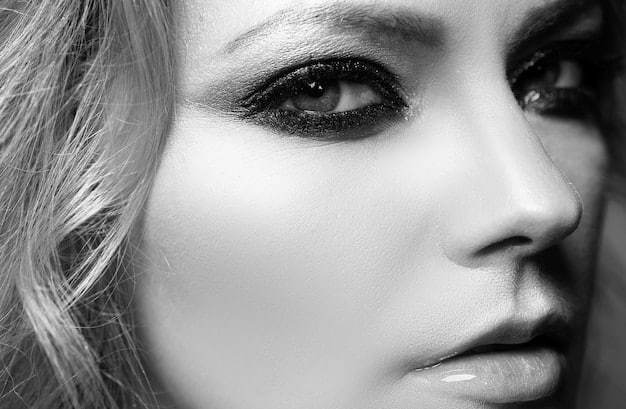
Creating a stunning smoky eye is achievable with these 10 easy steps, perfect for beginners wanting to master this classic and alluring makeup look.
Want to learn how to create a stunning smoky eye in 10 easy steps (beginner-friendly tutorial)? This guide breaks down the process into manageable steps, so anyone can achieve this timeless and glamorous look.
Gather Your Supplies for a Smoky Eye
Before diving in, it’s essential to have all the necessary tools at your fingertips. Having the right products can make the application smoother and more precise, resulting in a professional-looking finish. This ensures you won’t be scrambling mid-application.
Essential Makeup Brushes
Investing in quality brushes is key to achieving a well-blended smoky eye. Different brushes serve different purposes, from packing on color to seamlessly blending edges. Here are a few must-haves.
- Flat Shader Brush: Ideal for applying eyeshadow to the lid.
- Blending Brush: A fluffy brush to blend eyeshadow without harsh lines.
- Pencil Brush: For precise application in the crease and along the lash line.
Having these brushes will provide a solid foundation for creating your smoky eye.
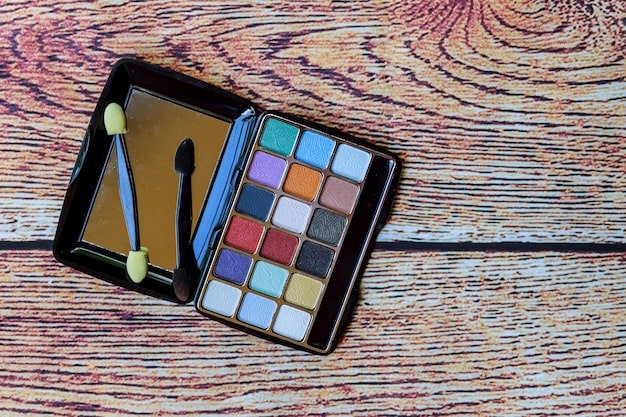
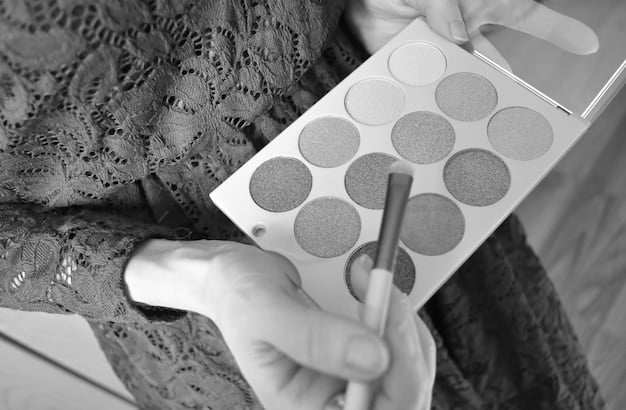
Eyeshadow Palette Essentials
A good eyeshadow palette is the heart of your smoky eye. Look for palettes with a range of neutral shades and at least one or two dark shades for creating depth and drama. Consider these guidelines:
- Neutral Base Shades: Matte creams, tans, or light browns to create an even base.
- Transition Shades: Medium browns or taupes for blending into the crease.
- Dark Shades: Deep browns, blacks, or grays for adding smokiness and dimension.
With the palette ready, you’ll be equipped for any smoky eye look.
Selecting the right tools ensures a seamless and beautiful smoky eye application, making the process more enjoyable and the results more professional.
Prep Your Eyelids for Long-Lasting Wear
Prepping your eyelids is a crucial step for achieving long-lasting, crease-free eyeshadow. Without proper preparation, eyeshadow can fade, crease, or even disappear throughout the day. A good base ensures even application and vibrant color.
Using an Eyeshadow Primer
An eyeshadow primer creates a smooth, even canvas for your eyeshadow, preventing it from creasing and enhancing its pigmentation. This is how you should use it properly:
- Apply a Thin Layer: Use your finger or a small brush to apply a thin layer of primer to your entire eyelid, from lash line to brow bone.
- Allow to Dry: Let the primer dry for a few seconds before applying any eyeshadow.
Applying eyeshadow primer guarantees a look that lasts all day.
Setting with a Base Eyeshadow
After applying primer, set it with a base eyeshadow that matches your skin tone. This helps to further smooth the surface and create a seamless transition for your other eyeshadows.
Setting the primer with a base eyeshadow ensures a smooth canvas, making the subsequent eyeshadow colors blend more evenly and last longer.
With your eyelids properly prepped, your eyeshadow will stay vibrant and crease-free, making your smoky eye look flawless for hours.
Apply a Neutral Base Eyeshadow
Applying a neutral base eyeshadow sets the stage for a seamless blend and enhances the colors you layer on top. This step creates a uniform canvas for the rest of your smoky eye. A smooth base makes all the difference!
Choosing the Right Shade
Select a neutral shade that closely matches your skin tone. Matte finishes work best as they create a smooth, even surface for blending subsequent shades. If you have fair skin, a light cream or beige shade works well. For medium skin tones, try a soft tan. Deeper skin tones can opt for a warm brown.
Selecting the right shade is important to ensure the best possible result.
Applying the Base Shade Evenly
Use a flat shader brush to gently pat the neutral eyeshadow all over your eyelid, from lash line to crease. Ensure that the color is evenly distributed for a smooth, uniform base. This provides a blank canvas for the rest of your smoky eye creation.
By applying a neutral base eyeshadow, you create a smooth canvas for blending other colors, ensuring a professional and polished smoky eye look.
Layer a Transition Shade in the Crease
A transition shade is essential for creating a seamless blend between the base color on your lid and the darker shades in your crease. This step prevents harsh lines and ensures a gradient effect, giving your smoky eye a professional appearance.
Selecting the Correct Transition Shade
Choose a shade that is a few shades darker than your base color. Look for matte shades in neutral colors such as light browns, taupes, or soft peaches. The transition shade should be warm enough to complement the darker shades you’ll be using later, but subtle enough to blend seamlessly.
The right color for the transition shade is key.
Blending the Transition Shade
Use a fluffy blending brush to apply the transition shade to your crease. Start at the outer corner of your eye and use windshield-wiper motions to blend the color back and forth. This technique ensures the color is evenly distributed and seamlessly blended into the base shade.
- Light Pressure: Use a light touch to avoid over-applying the color.
- Circular Motions: Blend using small, circular motions to soften any hard lines.
- Build Gradually: Slowly build up the color until you achieve the desired depth.
Blending the transition shade creates a soft gradient, making your smoky eye appear more polished and professional which is highly desirable.
Add Dark Eyeshadow to the Outer Corner
Adding a dark eyeshadow to the outer corner of your eye is what creates the signature smoky effect. This step adds depth and dimension, making your eyes appear more captivating and sultry. Precision and blending are crucial for a flawless result.
Choosing a Dark Shade
Select a dark eyeshadow that complements your skin tone and desired look. Matte black is a classic choice, but deep browns, grays, or even navy blues can also work beautifully. Consider your outfit or the occasion when choosing your dark shade.
- Black: For a dramatic and intense smoky eye.
- Dark Brown: For a softer, more natural look.
- Gray: For a cool-toned, modern smoky eye.
Choosing the right shade will influence the overall impact of your smoky eyes.
Applying the Dark Shade
Use a pencil brush or a small shader brush to apply the dark shadow to the outer corner of your eyelid. Focus the color on the outer third of your lid, close to your lash line. Gently pat the color on to build intensity.
Carefully applying the darker shadow makes all the difference.
Adding dark eyeshadow to the outer corner is a pivotal step in creating the smoky eye, providing depth and drama that defines the look.
Blend, Blend, Blend: The Key to Smoky Eyes
Blending is unequivocally the most critical part of creating a stunning smoky eye. Poorly blended eyeshadow can look patchy and unprofessional, while well-blended eyeshadow creates a seamless gradient and a polished finish. It is a crucial step.
Techniques for Seamless Blending
Achieving a seamless blend requires patience and the right techniques. Use a clean, fluffy blending brush to soften the edges of the dark shadow, blending it into the transition shade and base color.
- Windshield Wiper Motions: Use back-and-forth motions to blend the colors together.
- Circular Motions: Use small, circular motions to buff out any harsh lines.
- Light Pressure: Apply light pressure to avoid muddying the colors.
Proper blending is really important for a final result you will be proud of.
Common Blending Pitfalls to Avoid
Many beginners encounter common issues during the blending process. Here are a few pitfalls to avoid:
Avoiding these pitfalls will help you achieve a flawlessly blended smoky eye every time.
Mastering the art of blending is essential for creating a professional-looking smoky eye, transforming your makeup from amateur to expert.
Smudge Eyeshadow Along the Lower Lash Line
Smudging eyeshadow along the lower lash line balances the look and adds depth to your smoky eye. This step connects the upper and lower portions of your makeup, creating a cohesive and sultry effect. Apply with care!
Choosing the Right Shade for the Lower Lash Line
Use the same dark shade you applied to the outer corner of your upper lid, or a slightly softer version of it. This is for consistency. A dark brown can be a great option for a softer smoky eye, while a black or gray will add more intensity.
This choice will influence the final outcome quite a bit!
Smudging Techniques
Use a small, angled brush or a pencil brush to gently smudge the eyeshadow along your lower lash line. Start at the outer corner and work your way inwards, keeping the line thin and close to the lashes. A little goes a long way.
- Keep it Thin: Avoid applying too much product to prevent a heavy, raccoon-eye effect.
- Blend Gently: Use a cotton swab or your finger to soften the edges for a seamless blend.
- Connect the Corners: Ensure the eyeshadow on the lower lash line connects with the shadow on the upper lid at the outer corner.
Smudging eyeshadow along the lower lash line ties the entire look together, enhancing the smoky effect and creating a mesmerizing gaze.
Highlight the Inner Corner and Brow Bone
Highlighting the inner corner of your eye and brow bone adds dimension and brightness to your smoky eye. This step strategically reflects light, making your eyes appear larger and more awake.
Selecting a Highlight Shade
Choose a light, shimmery shade for highlighting. Champagne, ivory, or light gold tones work well for most skin tones. Ensure the shade is significantly lighter than your skin tone to create a noticeable contrast.
Choosing the color to highlight is extremely important.
Applying the Highlight
Use a small brush to apply the highlighter to the inner corner of your eye, blending it slightly into the lid. Then, apply the highlighter to your brow bone, right beneath the arch of your eyebrow. Blend well for a seamless finish.
- Inner Corner: Apply a small amount to brighten the eyes.
- Brow Bone: Blend well for a natural lift.
Highlighting the inner corner and brow bone adds a professional touch, creating a balanced and luminous smoky eye.
Apply Eyeliner and Mascara
Applying eyeliner and mascara are essential finishing touches to complete your smoky eye look. Eyeliner defines your lash line, adding intensity and definition, while mascara enhances your lashes, making them appear longer and fuller.
Choosing the Right Eyeliner
Select an eyeliner that suits your desired level of drama. Pencil liners are great for smudging and creating a softer look, while gel or liquid liners offer more precision and intensity.
- Pencil Liner: For a soft, smudged look.
- Gel Liner: For precise lines and long-lasting wear.
- Liquid Liner: For a bold, dramatic look.
The choice of eyeliner will impact how you finish the look.
Applying Eyeliner and Mascara
Apply eyeliner along your upper lash line, getting as close to the lashes as possible. You can create a thin, subtle line or a thicker, more dramatic wing, depending on your preference. Finish with a coat or two of mascara on your upper and lower lashes to complete the look.
- Eyeliner: Apply close to the lash line for definition.
- Mascara: Coat lashes evenly for volume and length.
Applying eyeliner and mascara is the final polish, enhancing the definition and allure of your smoky eye.
Clean Up and Perfect Your Smoky Eye
Cleaning up and perfecting your smoky eye ensures a polished and professional finish. This final step involves correcting any mistakes, sharpening edges, and ensuring all the elements of your makeup work harmoniously together.
Techniques for Cleaning Up Mistakes
Use a cotton swab dipped in makeup remover to clean up any stray eyeshadow or eyeliner. Sharpen the edges of your eyeshadow with a small, angled brush and a touch of concealer for a crisp, defined look. By applying those techniques, you are almost there.
Cleaning up your look is important!
Setting Your Makeup
Finish by setting your makeup with a light dusting of translucent powder. This helps to prevent creasing and ensures your smoky eye stays in place all day or night. By setting it properly, your makeup will last longer.
- Translucent Powder: Lightly dust over the lid to set the eyeshadow.
- Setting Spray: A final spritz to lock everything in place.
Cleaning up and perfecting your smoky eye delivers a professional and flawless finish, ensuring you look your absolute best.
| Key Element | Brief Description |
|---|---|
| 🎨 Base Eyeshadow | A neutral shade that creates a smooth canvas on your eyelid. |
| ✨ Transition Shade | Blended in the crease to ensure a seamless gradient effect. |
| ⚫ Dark Eyeshadow | Applied to the outer corner for depth and smokiness. |
| 🌟 Highlight | Applied in the inner corner and brow bone, adding brightness and dimension. |
FAQ
Classic smoky eyes use blacks, grays, and deep browns. Experiment with navy blues or purples for a unique twist. Ensure you have a range of shades to create depth and dimension.
Use an eyeshadow primer to create a smooth base. Set the primer with a neutral eyeshadow. Also, avoid applying too much product at once; build the color gradually. Set the makeup with a dusting of translucent powder.
Essential brushes include a flat shader brush for applying color to the lid, a blending brush for softening edges, and a pencil brush for precise application in the crease and along the lash line.
Use a small, angled brush to gently smudge eyeshadow along your lower lash line. Keep the line thin and close to the lashes. Blend gently with a cotton swab or your finger for a seamless finish.
Highlight the inner corner of your eye and brow bone with a light, shimmery shade. This reflects light and makes your eyes appear larger. Apply eyeliner to the outer third of your upper lash line only.
Conclusion
Mastering the smoky eye technique is a valuable addition to any makeup routine. By following these 10 easy steps, even beginners can achieve a stunning and professional look. With a little practice, you will be confident in creating captivating smoky eyes for any occasion.


