The Ultimate Guide to Highlighting: Get Your Lit-From-Within Glow

Highlighting is the makeup technique that uses light to enhance your best features, creating a radiant, healthy glow that makes you look like you’re lit from within.
Want to achieve that coveted lit-from-within glow? This ultimate guide to highlighting: achieve a lit-from-within glow breaks down everything you need to know, from choosing the right highlighter to mastering application techniques that enhance your natural beauty.
Understanding the Magic of Highlighting
Highlighting is more than just adding shimmer to your face; it’s about strategically using light to sculpt and define your features. By understanding the basics of light reflection and how it interacts with your skin, you can enhance your bone structure, create a youthful appearance, and achieve a radiant complexion.
Whether you’re a makeup novice or a seasoned pro, this guide will provide you with the knowledge and techniques to unlock the transformative power of highlighting.
What is Highlighting?
In its simplest form, highlighting involves using a lighter shade or a product with light-reflecting particles on areas of the face where light naturally hits. This creates the illusion of higher planes and draws attention to your best features.
The Benefits of Highlighting
Beyond adding a touch of shimmer, highlighting offers a range of benefits:
- Enhances Bone Structure: Highlighting the cheekbones, brow bone, and bridge of the nose can create the illusion of higher, more defined features.
- Creates a Youthful Glow: By reflecting light, highlighters can minimize the appearance of fine lines and wrinkles, resulting in a more youthful complexion.
- Brightens the Complexion: Applying highlighter to the inner corners of the eyes and the Cupid’s bow can instantly brighten the face and create a more awake and radiant appearance.
- Sculpts and Defines: Highlighting, when used in combination with contouring, can sculpt the face and create dimension.
Understanding the principles behind highlighting allows you to customize your technique to suit your personal preferences and achieve a variety of looks, from subtle and natural to bold and glamorous.
Choosing the Right Highlighter for Your Skin
With a seemingly endless array of highlighters available, selecting the right one for your skin type and tone can feel overwhelming. Understanding the different types of highlighters and how they complement various skin tones is crucial for achieving a flawless, natural-looking glow.
The key is to consider your skin’s undertone and texture when making your selection.
Types of Highlighters
Highlighters come in various forms, each offering a unique finish and application method:
- Powder Highlighters: Ideal for oily or combination skin, powder highlighters offer a buildable, controlled application. They come in a variety of finishes, from subtle shimmer to intense glitter.
- Cream Highlighters: Perfect for dry or mature skin, cream highlighters provide a dewy, hydrating glow. They blend seamlessly into the skin and create a natural, radiant finish.
- Liquid Highlighters: Suitable for all skin types, liquid highlighters offer versatility and customizable intensity. They can be mixed with foundation for an all-over glow or applied directly to the high points of the face.
- Stick Highlighters: Convenient and travel-friendly, stick highlighters are easy to apply and blend. They are available in both cream and powder formulas.
Matching Highlighter to Skin Tone
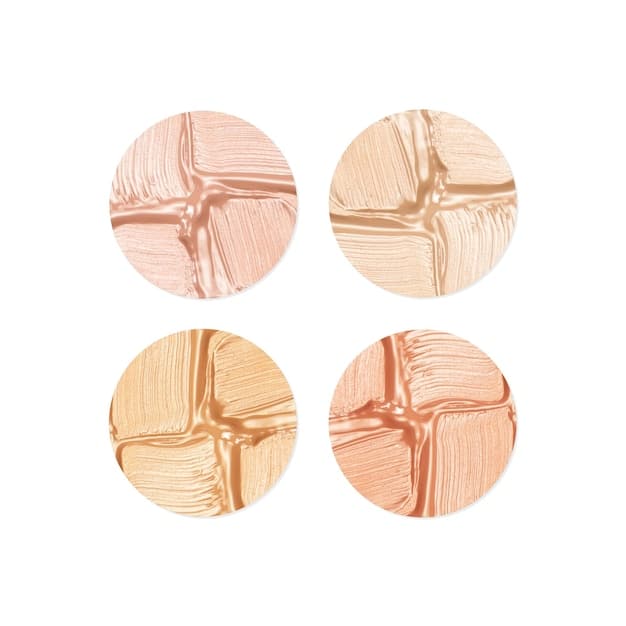
Choosing the right highlighter shade is essential for a natural-looking result:
- Fair Skin: Opt for highlighters with pearlescent or champagne tones. Avoid shades that are too dark or golden, as they can appear muddy.
- Light to Medium Skin: Experiment with rose gold, peach, or light gold highlighters. These shades add warmth and radiance to the complexion.
- Medium to Tan Skin: Choose highlighters with gold, bronze, or copper tones. These shades complement warmer undertones and create a sun-kissed glow.
- Deep Skin: Opt for highlighters with bronze, copper, or deep gold tones. These shades provide a stunning, multidimensional highlight that complements rich skin tones.
By carefully considering your skin type and tone, you can select a highlighter that perfectly enhances your natural beauty and creates a luminous, healthy-looking glow.
Essential Tools for Highlighting
While the right highlighter is crucial, the tools you use to apply it can significantly impact the final result. Choosing the appropriate brushes and sponges allows for precise application and seamless blending, ensuring a natural, flawless finish.
Investing in quality tools will elevate your highlighting game and help you achieve a professional-looking glow.
Brush Selection
Different brushes are designed for specific highlighting techniques:
- Tapered Brush: Ideal for precise application on the cheekbones, brow bone, and bridge of the nose. The tapered shape allows for controlled placement and seamless blending.
- Fan Brush: Perfect for a subtle, diffused highlight. The fan shape gently sweeps the product onto the skin, creating a soft, ethereal glow.
- Small Detail Brush: Use for highlighting the inner corners of the eyes and the Cupid’s bow. The small size allows for precise application in these delicate areas.
Sponge Application
Sponges can also be used for highlighting, particularly with cream and liquid formulas:
- Damp Sponge: Dampen a sponge before applying highlighter to prevent the product from absorbing too quickly. This creates a sheer, dewy finish.
- Stippling Motion: Use a stippling motion (pressing and releasing the sponge) to blend the highlighter seamlessly into the skin. Avoid dragging the sponge, as this can disrupt the base makeup.
Experiment with different brushes and sponges to find the tools that work best for your personal preferences and the type of highlighter you’re using. With the right tools, you can achieve a flawless, professional-looking highlight every time.
Mastering Highlighting Techniques
Now that you’ve chosen the perfect highlighter and tools, it’s time to master the application techniques that will transform your complexion. Understanding where to apply highlighter and how to blend it seamlessly is key to achieving a natural, radiant glow that enhances your features.
The goal is to create dimension and draw attention to your best assets, without looking overly shimmery or artificial.
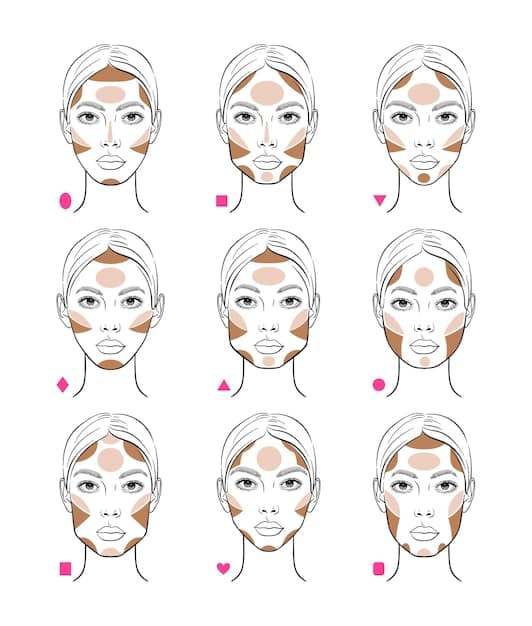
Key Areas to Highlight
Strategic placement is essential for a flattering highlight:
- Cheekbones: Apply highlighter along the tops of the cheekbones, blending upwards towards the temples. This will enhance your bone structure and create a more sculpted appearance.
- Brow Bone: Apply highlighter just below the brow bone to lift the eyebrows and create a more awake and youthful appearance.
- Bridge of the Nose: Apply a thin line of highlighter down the bridge of the nose to create the illusion of a longer, more defined nose.
- Inner Corners of the Eyes: Apply highlighter to the inner corners of the eyes to brighten the face and make you look more alert.
- Cupid’s Bow: Apply highlighter to the Cupid’s bow (the dip in the center of the upper lip) to accentuate the lips and create a fuller pout.
Blending Techniques
Seamless blending is crucial for a natural-looking highlight:
- Use Light Layers: Apply highlighter in thin, buildable layers. This will prevent the product from looking cakey or unnatural.
- Blend with a Light Hand: Use a light, feathery touch when blending highlighter. Avoid pressing too hard, as this can disrupt the base makeup.
- Blend Outwards: Blend the highlighter outwards, away from the center of the face. This will create a soft, diffused glow.
Practice makes perfect! Experiment with different techniques and placements to find what works best for your face shape and features. With a little experimentation, you’ll be able to achieve a customized highlight that enhances your natural beauty.
Highlighting for Different Skin Types
The best way to highlight isn’t just about the tool you use, but the way you prep it and the specific techniques implemented that will truly make the difference.
When highlighting, it’s important to consider your personal skin type, as oil and moisture levels may affect the process.
Oily Skins
Those with oily skin tend to have more trouble applying and sticking foundation to their face, but if you follow the guide below, highlighting on your skin type will be a breeze!
- Use lightweight or powder based products. If you use heavier, oily products, you’ll find that it’s harder to properly and evenly apply the product.
- Use a setting spray or powder to keep you highlighted. Your face will stay as you envisioned it when you first put it on!
Dry Skins
For dry skins, hydration is key if you want your face to stay moisturized, smooth, and most importantly, vibrant. Consider the tips below:
- Prep with Moisturizer: Before applying any makeup, make sure to hydrate your skin with a quality moisturizer. This will create a smooth canvas for the highlighter and prevent it from clinging to dry patches.
- Use Cream or Liquid Formulas: Cream and liquid highlighters are ideal for dry skin, as they provide hydration and a dewy finish. Avoid powder highlighters, as they can accentuate dryness.
- Avoid Over-Highlighting: Less is more when it comes to highlighting dry skin. Applying too much highlighter can draw attention to dry patches and create an unnatural appearance.
By adapting your highlighting technique to your specific skin type, you can achieve a flawless, long-lasting glow that enhances your natural beauty.
Troubleshooting Common Highlighting Mistakes
Even with the best techniques, highlighting can sometimes go wrong. Avoiding common mistakes is key to achieving a natural, radiant glow. Recognizing and correcting these errors will elevate your highlighting game and ensure a flawless finish every time.
The most important thing to remember is that blending the product on your face correctly is key to completing the goal.
Avoiding the Glitter Bomb
Applying too much highlighter can result in a glittery, unnatural look:
- Start with a Small Amount: Begin with a small amount of product and build up the intensity gradually.
- Tap Off Excess: Before applying highlighter to your face, tap off any excess product from your brush or sponge.
- Avoid Glittery Formulas: Opt for highlighters with a subtle shimmer rather than large glitter particles.
Preventing the Stripe Effect
Applying highlighter in a harsh, unblended line can create a stripe effect:
- Use a Blending Brush: Use a soft, fluffy brush to blend the highlighter seamlessly into the skin.
- Blend in Circular Motions: Use gentle, circular motions to blend the highlighter outwards, away from the center of the face.
- Check Your Work: Step back from the mirror and check your work in natural light to ensure that the highlighter is blended seamlessly.
By avoiding these common mistakes and practicing your highlighting technique, you can achieve a flawless, natural-looking glow that enhances your features and boosts your confidence.
| Key Point | Brief Description |
|---|---|
| ✨ Choosing the Right Highlighter | Match your highlighter to your skin tone and type (powder, cream, liquid) for best results. |
| 🖌️ Essential Tools | Use tapered, fan, or detail brushes for precise application; damp sponges for blending. |
| 📍 Key Application Areas | Apply to cheekbones, brow bone, nose bridge, inner eye corners, and Cupid’s bow. |
| ✔️ Blending is Key | Blend lightly in circular motions to avoid harsh lines. Build intensity gradually. |
Frequently Asked Questions
▼
Highlighting enhances features by reflecting light, creating dimension on areas like cheekbones, brow bones, and the nose bridge, resulting in a radiant, sculpted look. It also adds a youthful glow.
▼
Yes, the key is to select the right type. Powder highlighters work well for oily skin, while cream and liquid formulas are ideal for dry skin. Proper application techniques work on any skin.
▼
Target the high points of your face—tops of the cheekbones, brow bone, bridge of the nose, inner corners of the eyes, and above the Cupid’s bow for a well-defined glow. If you don’t know where yours is, test out what works for you!
▼
Avoid applying too much product, using overly glittery formulas, and forgetting to blend. Start with a little highlighter and add where needed and always blend!
▼
For fair skin, pearlescent or champagne tones work best; rose gold and peach suit light to medium; and gold, bronze, or copper tones enhance medium to deep skin for a brilliant highlight.
Conclusion
Achieving a lit-from-within glow is within reach with the right knowledge and techniques. By understanding the principles of highlighting, choosing the right products and tools, and mastering application techniques, you can transform your complexion and enhance your natural beauty. Experiment, practice, and have fun creating your own signature highlight!


